Setting Up IDP User Provisioning and Mapping in AnyDesk: A Complete Guide for Enterprise Users
Add multiple users via IDP
This feature is available for users with an Enterprise-Cloud or Ultimate-Cloud license.
The IDP user provider allows the owner of an organization to create users for that organization using an identity management system that supports OpenID Connect (e.g., Microsoft Azure Active Directory). You can set up the IDP in my.anydesk II, enabling users from your organization to log in with SSO using the organization’s ID and their company credentials.

In this chapter, you will learn about the prerequisites needed for IDP setup, how to configure IDP via the my.anydesk management console, and how to set up an IDP mapper. For more information about user provider types, see User Providers.
Prerequisites
Before configuring IDP in my.anydesk II, you need to set up your identity provider first. You can use any third-party identity provider that supports OpenID Connect, such as Microsoft Azure Active Directory.
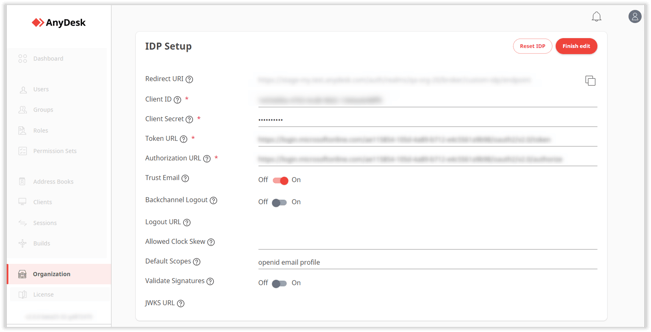
For IDP configuration in my.anydesk II, you will need the following data:
- Client Secret.
- Application (Client ID)
- Authorization endpoint.
- Token endpoint.

Configure IDP
You need to configure IDP to create a connection between my.anydesk II and your identity provider. Please note that you will not be able to edit users in my.anydesk II created through the IDP since they are synchronized with the identity provider.
To configure IDP in my.anydesk II, follow these steps:
- Open my.anydesk II and go to Organization.
- In the General section, click Edit, and in the User Provider field, select IDP.
- Follow the on-screen instructions to complete the setup.
For a detailed guide on how to configure the IDP, visit this link.
After completing the above steps, all users from your identity provider will be able to sign in to my.anydesk II with SSO using the organization’s ID.

Set up IDP Mapper
You can map roles from your organization to users in my.anydesk II, eliminating the need to manually assign roles to users.
To set up the IDP mapper:
- Open my.anydesk II and go to Organization.
- Scroll down to the IDP mapper section, click Create new IDP mapper, and provide the required information.

After mapping the roles, users from your identity provider will automatically have the assigned permissions when logging in to my.anydesk II.
- Published at