Ultimate Guide to AnyDesk for macOS: Installation, Security, and Customization Tips
AnyDesk for macOS
Ease of Connectivity and Customization
The AnyDesk remote desktop application for macOS offers seamless connectivity and hassle-free setup, with the capability to tailor custom clients to meet specific operational needs.
System Requirements
AnyDesk for macOS is compatible with macOS 10.11 and newer.
For macOS 11.0 Big Sur and newer, as well as Apple Silicon devices, AnyDesk for macOS 6.1.0 and later is supported. Legacy clients for macOS 10.10 can be accessed here, though they are no longer supported.
Installation & Uninstallation
Installation
Refer to Installation – Operating-System-Specific Instructions – macOS for installation guidelines.
To set up the necessary security permissions for incoming sessions, please see Security Permissions on macOS.
Uninstallation
For the portable version of AnyDesk for macOS:
- Move AnyDesk from the “Applications” folder to Trash
- Delete the ~/.anydesk/ and /etc/anydesk/ folders for standard AnyDesk clients
- Delete the ~/.anydesk-ad_
/ and /etc/anydesk-ad_/ folders for custom AnyDesk clients
For the installed version:
- Go to Menu > About AnyDesk
- Hold the option/ALT key
- Click “Uninstall” on the top right corner of the window
- Follow the subsequent steps to complete the uninstallation process.
Security Permissions
For security permissions on macOS, please refer to Security Permissions for macOS.
Notarization
To overcome potential warnings when starting up the custom client, a workaround is to right-click the custom AnyDesk application and select “Run”. Alternatively, users can enable “Notarize Client” in the custom client configurator to mitigate the warning prompt.
Note: The notarization process timeframe varies based on the current load on Apple notarization servers. It can range from 15 minutes to 6 hours. If the notarization continues beyond 6 hours, it’s recommended to create a copy of the custom client configuration and notarize the copy.
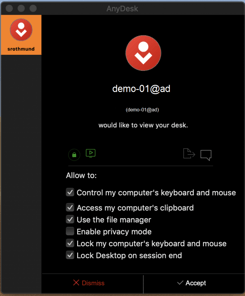
Accept Window
The Accept Window prompts when a connection request is made to the AnyDesk client, displaying options to accept or reject the connection request or disconnect the session, among other features.
Explore the Accept Window and its functionalities including access to files, chat with the connecting client, and setting permissions of the connecting client.
File Manager
Access the File Manager by entering the AnyDesk-ID/Alias of the remote device and clicking “Browse files”.
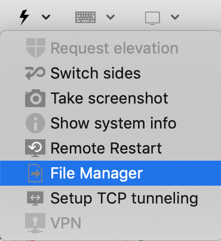
The File Manager can also be accessed using the Files icon in the AnyDesk toolbar.
Note: Network drives and UNC paths are currently not supported.
For detailed information on file transfer, visit File Manager and File Transfer.
Cross-platform Shortcuts
Due to discrepancies in functionality between macOS, Windows, and Linux Super Keys, direct translation of operating-system-specific keyboard shortcuts is not feasible.
Refer to the provided table and examples for using cross-platform shortcuts based on the device being controlled.
Settings
In addition to the standard settings available across all platforms, macOS users can make the following unique adjustments in the “User Interface” tab:
- Transmit keyboard shortcuts
- Accept all remote keyboard shortcuts
- Use Right Command as a Host Key
Audio
Audio transmission is available on remote macOS devices running macOS 13 (Ventura) and newer, as well as AnyDesk 7.2.0 and later for macOS.
Address Book
For details on the Address Book feature, please visit Address Book.
Haz clic para continuar leyendo
- Published at