Ultimate Guide to AnyDesk Remote Print Feature: Installation, Requirements, and Print Settings
Remote Print
Table of Contents
Requirements | Installation | Sending a Print Request | Print Settings
The Remote Print feature enables you to print a document or image from a remote device directly to a printer connected to the local endpoint.
To achieve this, AnyDesk uses a virtual printer (the AnyDesk Printer) on the remote device to send print jobs to the local printer.
Requirements:
- Both the local and remote endpoints need to be running Windows 7+ or Windows Server 2012+.
- AnyDesk 5.0 for Windows or later needs to be installed on both the local and remote endpoints.
- A printer needs to be installed and connected to the local endpoint.
Note: The driver only needs to be installed on the remote device.
Installation
There are two ways to install the AnyDesk Printer drivers:
- Enable “Install AnyDesk Printer” when installing AnyDesk.
- Go to Settings > Printer > Outgoing Print Jobs and click “Install AnyDesk Printer”.
Note: Administrator privileges are required to install the driver.
Sending a Print Request
- When opening the print dialogue of an application on the remote device, choose “AnyDesk Printer” from the list of printers and click “Print”.
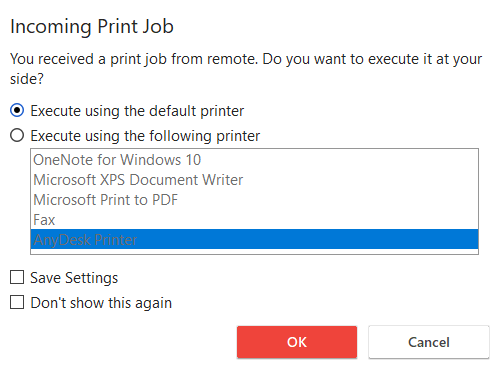
- AnyDesk then displays the Incoming print-job dialogue on the local device. The local user can choose to use the default printer or manually select which printer to use.
Print Settings
In addition to the option to install the AnyDesk Printer driver if it has not already been installed, the Printer Settings found in Settings > Printer also allow the user to configure the default behavior of the Remote Print feature.
There are three modes to handle incoming print jobs:
- Dismiss (Automatically decline incoming print jobs)
- Print using the default printer
- Print using a specified printer
From the settings, the user can also enable “Automatically execute incoming print jobs using the chosen printer”, thereby bypassing the Incoming print-job dialogue.
Haz clic para continuar leyendo
- Published at
