Ultimate Guide to AnyDesk Settings: Customize Your Client for Maximum Efficiency
AnyDesk Settings
Table of Contents
| User Interface | Security | Privacy | Display |
|---|---|---|---|
| Audio | Connection | File Transfer | Recording |
| Printer | Wake-On-LAN | License Key | About AnyDesk |
AnyDesk offers a wide range of settings to customize a client according to the user’s specific preferences.
User Interface
The User Interface settings can be accessed in Settings > User Interface. These settings mainly impact the AnyDesk window’s user interface.
Here, you can:
- Set the language
- View the AnyDesk-Alias
- Configure the client to display the AnyDesk-ID instead of the Alias
- Hide the local taskbar when the AnyDesk window is maximized
- Prompt for a comment after the session ends
The session comment will be visible in the Sessions tab of the my.anydesk.com customer portal linked to the client’s license. - Open the Address Book when starting up AnyDesk
- Automatically display the Accept Window when a chat message has been received
- Hide the sidebar in the main AnyDesk window
- Show the primary “Remote Desk” field in the main AnyDesk window
Security
For AnyDesk’s installed on the device, administrative access is required to unlock these settings. This can be achieved by clicking the “Unlock Security Settings” button at the top of “Settings” > “Security”.

Interactive Access
Under “Interactive Access,” you can specify when the Accept Window is displayed upon incoming session requests.
Incoming session requests can either be automatically rejected or require user interaction.
If Interactive Access is enabled, the Accept Window will be displayed whenever an incoming session request arrives.
To start the session, the request must be accepted either by pressing ‘Accept’ in the Accept Window or by providing valid credentials (see Unattended Access).
There are three options for incoming connection requests:
- Always show
- Only allow when AnyDesk’s main window is open
- Never (Client is then only accessible using Unattended Access)
Note: In case Interactive Access is disabled, session requests can still be accepted by providing valid credentials (see Unattended Access).
Permission Profiles (AnyDesk 7+)
Refer to Permission Profiles.
Unattended Access
Check Unattended Access for more details.
Access Control List
The Access Control List (ACL) is a whitelist-based security feature located in Settings > Security > Access Control List.
Only AnyDesk-IDs and Aliases registered in the access control list of the client are able to request connections to that client. Clients with AnyDesk-IDs and Aliases not registered to the access control list are automatically rejected.
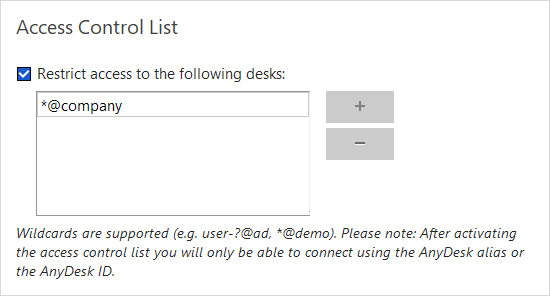
Wildcard ACL entries are also available. By using “*” or “?”, you can enter partial AnyDesk-IDs or Alias. “*” denotes a string of any length whereas “?” represents a single character.
For example, in case a custom namespace like “@company” has been purchased, a wildcard entry such as “*@company” would ensure that only aliases in the custom namespace would be able to connect to the AnyDesk client.
Standard Permissions of Remote Users
The listed permissions are the default permissions for users connecting via the Accept Window.
Allow the connecting user to:
- Hear my computer’s sound output
- Control my computer’s keyboard and mouse
- Access my computer’s clipboard
- Access my computer’s clipboard to transfer files
- Lock my computer’s keyboard and mouse
- Restart my computer
- Use the File Manager
- Lock account on session end
- Request system information
- Print out my documents on their printer (See Remote Print)
- Draw on computer’s screen (See Whiteboard)
- Create TCP tunnels (See TCP-Tunneling)
- Enable privacy mode (See Screen Privacy)
- Show a colored mouse pointer when the connecting user does not have permission to control my device
Updates (Windows only)
Under “Settings” > “Security” > “Updates,” you can choose whether to automatically download or install new updates in our Automatic Update channel. For more information, view Update.
- Keep AnyDesk client automatically up to date.
Please note that this is not available for custom clients - Download updates and ask for installation
- Disable auto-update
- Beta version
Discovery
Through AnyDesk’s Discovery features, AnyDesk can automatically detect all AnyDesk clients on the same local area network.
Discovered items display:
• Operating system
• Device name
• Alias/ID
• User image
Within the settings in “Settings” > “Security” > “Discovery,” you can:
- Configure whether the AnyDesk client should look for other AnyDesk clients on the same network
- Configure whether this AnyDesk client should be discovered by other AnyDesk clients on the same network
Discovery is enabled by default for installed AnyDesk clients. Discovery can also be enabled in portable mode by clicking the blue Discovery tab or going to “Settings” > “Security” > “Discovery”.
Note: If the Discovery feature is enabled, adjustments may be required in the Firewall.
Privacy
In “Settings” > “Privacy”, you can determine what information to display when connecting to a remote device in the Accept Window or when viewed as a recent sessions or Address Book entry.
Username: A custom or user account name displayed in the Accept Window when connecting to other devices.
User Image: A custom or user account image displayed in various locations, including the Accept Window. In the absence of an account image or if this option is disabled, the default AnyDesk user image will be shown.
Desk Preview: A screenshot or the desktop wallpaper of your device displayed in the Address Book or the list of Recent Sessions of other AnyDesk clients. This option can also be disabled, replacing the preview with a stock image.
Screenshot Path: The path where to save screenshots made during a session.
Chat Log: The path where to save the chat log. Chat logging can also be disabled from here.
Alternative Screen Background: Activation of this option allows you to configure the desktop background the users see when they connect to your device. You can upload a custom image or simply replace your desktop background with a plain color.
After all AnyDesk sessions have been disconnected from your client, your background will return to normal.
Screen Frame: Activating this feature will display an always-on-top border around your display when someone is connected to you. This allows you to easily know if someone is connected to your device.
Display
Refer to Display.
Audio
Under “Settings” > “Audio”, you can specify the audio devices to transmit and from which audio device sounds from the remote device should be output.
Transmission: Sends audio to the remote device during incoming sessions. Options include no transmission, your operating system’s standard device, or a specific device.
Output: Determines the output device during outgoing sessions. You can choose between no output, your operating system´s standard device, or a specific device.
Note: Audio is one-way. Create an additional reverse session for bidirectional audio transmission.
Connection
Direct Connection
If direct connections are enabled in “Settings” > Connection > “General”, AnyDesk will attempt to create a session tunnel between this AnyDesk client and the client it is trying to connect to.
If disabled, the AnyDesk session between the local and remote endpoints is routed through our servers. Note that as AnyDesk sessions are encrypted, AnyDesk cannot and will not access your session data.
Generally, direct connections are usually faster than a routed connection. However, for some network environments, you may experience network instability due to firewall or other security solution settings. Disable direct connections in the settings to avoid unexpected session ends.
Local Port Listening
For direct connections, TCP Port 7070 is used for listening by default. This port is opened when installing AnyDesk.
A custom port can be specified in “Settings” > “Connection” > “General” (Must be set for all clients).
HTTP-Proxy
Requirements:
The proxy server must:
- Support the CONNECT method
- Must not intercept or alter the SSL/TLS stream or connection.
AnyDesk supports using a Proxy Server. Available working modes are:
- disabled
- determined automatically (Proxy Auto-Config / PAC)
- specified
- IP
- Port
- Authentification
Note: The proxy must support the CONNECT method. Authentication can be done with Basic access and Digest access.
NTLM
As of AnyDesk 6.3.0 and later for Windows, NTLM authentication is supported as a form of proxy authentication.
Using NTLM, the usernames and passwords are encrypted and you can utilize your existing domain Windows credentials instead of a second set of independent credentials.
Why NTLM?
One use-case for NTLM is for companies that use Windows domain-configured accounts for their devices. With NTLM authentication for their proxies, they do not need to generate a new set of login credentials for every user and can simply use the existing credentials stored in their Windows domain controller. This has the added advantage of reducing the number of login credentials that the user needs to remember.
Furthermore, NTLM is more secure than Basic as it is encrypted.
File Transfer
Refer to File Manager and File Transfer.
Recording
In “Settings” > “Recording”, you can configure whether sessions should be automatically recorded by default.
These settings can be further customized to automatically record only incoming or outgoing sessions.
By default, the session recordings can be found in %homepath%\Videos\AnyDesk. Local custom pathing is also supported.
For a more detailed explanation, please refer to our Session Recording article.
Printer
There are three modes to handle incoming print jobs:
- Dismiss (Automatically decline incoming print jobs)
- Print using default printer
- Print using the specified printer
Refer to Remote Print.
Wake-on-LAN
Refer to Wake-on-LAN.
License Key
The AnyDesk license can be found on my.anydesk.com. For guidance on how to register your AnyDesk client to your account, please visit our Licensing article.
About AnyDesk
In About AnyDesk, you can view the version of your AnyDesk client, as well as the currently registered license.
In “Settings” > “About AnyDesk” > “Support Information”, you can access:
- Help and Support Website to open our Help Center using the default browser.
- Send Support Information to open the default email client to send our Support team your trace files. Please remember to also provide a description of the issue.
- Open Connection Trace to view a list of all clients that have made a connection request to this AnyDesk client.
Haz clic para continuar leyendo
- Published at