Ultimate Guide to Secure AnyDesk Settings for Enhanced IT Security
This guide is crafted for both IT administrators and end-users, offering practical advice on optimizing AnyDesk settings for improved security.
The document consists of the following chapters:
- my.anydesk II – Learn about the basic roles and permissions that can be assigned to users.
- Custom AnyDesk Client – Discover how to set up customized AnyDesk clients to enhance security.
- Use Case – Review an example of configuring custom AnyDesk clients.
my.anydesk II
Upon purchasing or registering for a trial, your my.anydesk II account is automatically generated using the registered email address. The Administrator account grants complete access to all settings within the my.anydesk II management portal, including organization setup and Identity Provider (IDP) configuration, alongside the ability to review session history and other data.
It’s advisable to use this account solely for the initial setup process. Afterwards, you can add users and assign them custom permissions tailored to their specific needs.
User and Permission Management
After purchasing the license, log into the my.anydesk II management portal and add users to your license. Once you have added all users, you can assign roles with various permissions to individual users or groups of users in your license.
Each role comes with different permission sets that define what users can see and do within the my.anydesk II management portal. Depending on the assigned role, users may have viewing access, editing capabilities, or no access to different sections of the my.anydesk II portal.
Assigning roles to users enhances productivity and security by reducing the likelihood of unauthorized access to features that should be restricted.
In the my.anydesk II management portal, the following preconfigured roles are available for the Ultimate license:
- Owner - Designed for the license holder, this role allows viewing and editing of every section in the management portal and the option to delete the organization.
- Administrator - This role enables users to view and edit all sections of the management portal, excluding License, Invoices, and personal profile.
- Support Agent - This role allows access to Users, Groups, Address Books, and Clients sections of the my.anydesk II management portal, tailored for IT support staff.
- Accountant - This role is designed for a person within your organization responsible for handling invoices, granting access only to view Organization, License, and Invoices sections.
- Data Protection Officer - This role permits users to view all sections of the my.anydesk II management portal, except Builds and personal profile.
- User - The default role for each user, allowing them to view and edit their own profile as well as access Clients and Builds sections.
In the following table, you can check the available roles for the Ultimate license and the permissions associated with each in the my.anydesk II sections.
| Section of my.anydesk II | Owner | Administrator | Support Agent | Data Protection Officer | Accountant | User |
|---|---|---|---|---|---|---|
| Personal Profile | View and Edit | x | x | x | x | View and Edit |
| License | View and Edit | View | x | View | View | x |
| Invoices | View and Edit | View | x | View | View | x |
| Users | View and Edit | View and Edit | View | View | x | x |
| Roles | View and Edit | View and Edit | x | View | x | x |
| Groups | View and Edit | View and Edit | View | View | x | x |
| Permission Sets | View and Edit | View and Edit | x | View | x | x |
| Address Books | View and Edit | View and Edit | View | View | x | x |
| Clients | View and Edit | View and Edit | View | View | x | View |
| Sessions | View and Edit | View and Edit | x | View | x | x |
| Builds | View and Edit | View and Edit | x | x | x | View |
| Organization | View and Edit | View and Edit | x | View | View | x |
It’s also possible to create custom permissions and roles. It is advisable to grant only the minimum required permissions. For more information on configuring user and role management, you can refer to additional resources available or the official documentation.
Two-Factor Authentication for my.anydesk II
Adding an extra layer of security can be done by setting up two-factor authentication for your my.anydesk account. When logging in, you’ll need to provide your login, password, and an additional security code.
To activate two-factor authentication:
- Log into my.anydesk II with your AnyDesk account credentials.
- Click on your name in the upper right corner of the page and select My Profile.
- In the Multi-Factor Authentication section, click on Edit.
- Open the authentication app on your mobile device, scan the QR code, and complete the following:
a. Specify the Device Name.
b. Enter the Code from the authentication app.
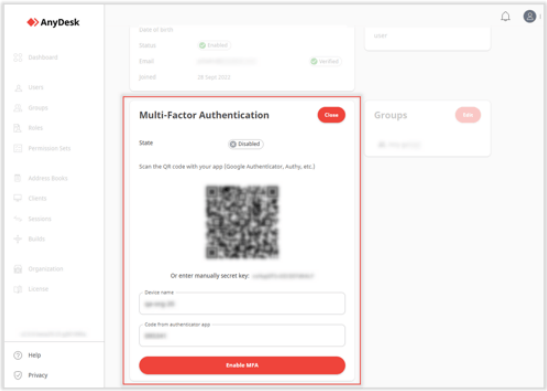
- Click on Enable MFA.
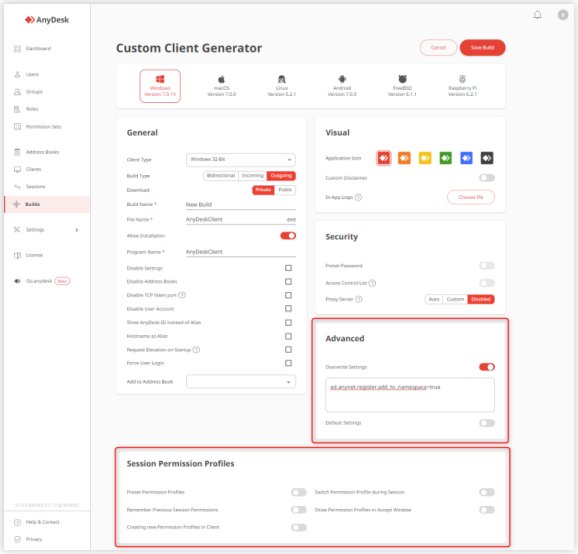
Custom AnyDesk Client
AnyDesk provides two types of clients (applications) that you can install on your devices:
- Default AnyDesk Client – A standard AnyDesk application with default settings and configurations available for all users. You can download it from our website.
- Custom AnyDesk Client – A fully user-customized AnyDesk application in the my.anydesk II management portal. You can tailor the application’s settings and permissions according to your requirements.
For more information on customizing the AnyDesk client, refer to this page.
Incoming and Outgoing Only Clients
Depending on user needs, you can configure your AnyDesk client to one of the following options:
- Incoming Only – A client that can only receive connections from another device.
- Outgoing Only – A client that can only initiate an outgoing connection.
- Bidirectional – A client that can create connections to another device and receive incoming connection requests.
To enhance technical support processes, it is advised that administrators and other employees using AnyDesk for device connections configure outgoing-only AnyDesk clients. This approach proves especially beneficial as support staff typically do not require incoming connections from external sources. As they only need to connect to employee devices, this prevents incoming connection requests, thus making the process safer and more efficient.
Conversely, employees receiving support should have an incoming-only AnyDesk client. This ensures that no connections can be established from employee devices. For more information, refer to this page.
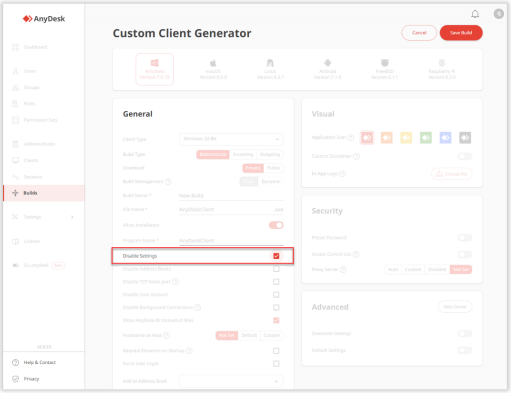
Settings
Security and connection configurations in the AnyDesk client are protected by User Account Control (UAC) and require administrative rights for modification. However, you can preconfigure them and lock them so that users cannot change any settings within the AnyDesk client after installation.
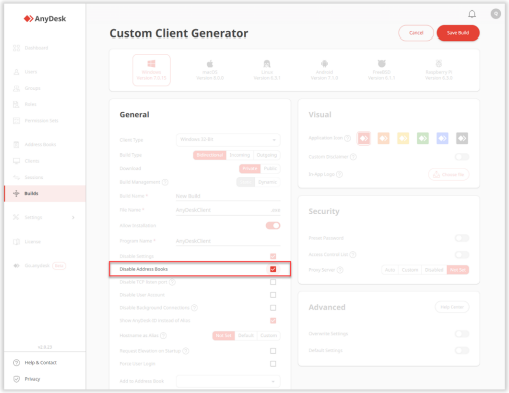
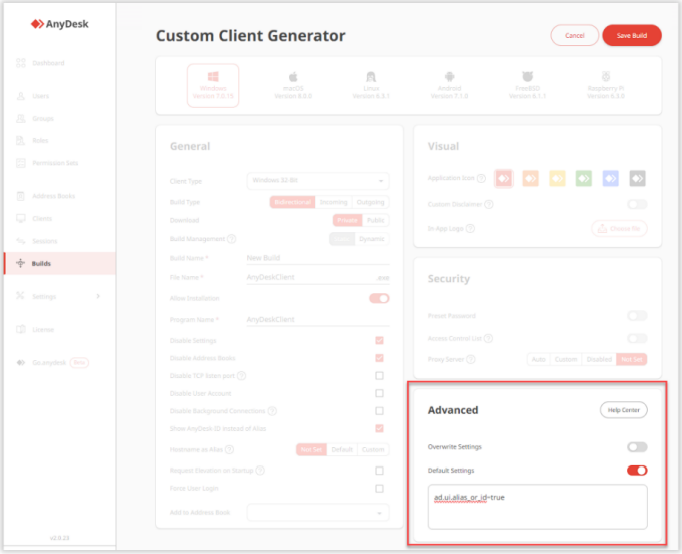
When creating a custom AnyDesk client in the my.anydesk II management portal, it is recommended to disable access to the following sections of the AnyDesk client:
-
Settings: It is advisable to disable access to settings in the client, as modifications are unnecessary once the AnyDesk client is installed, except for setting up two-factor authentication.
-
Address Book for Incoming Only Clients: Disable the address book for clients that will be installed on devices that will only receive connections.
-
Specific Categories: You can disable specific functions or sections of the AnyDesk client by adding key values in the Advanced section. A list of all available key values can be found here.
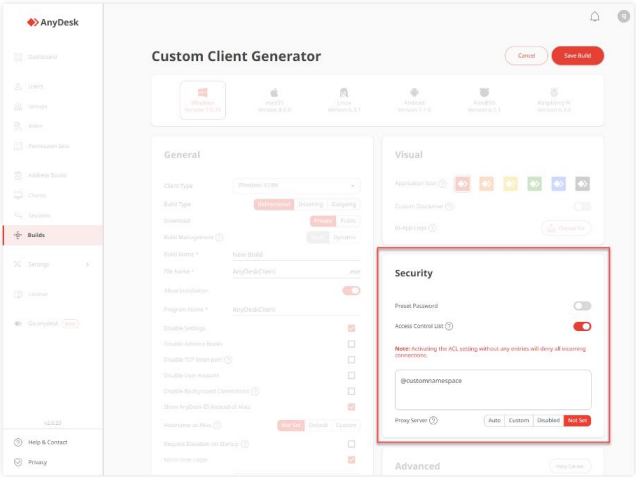
Access Control List (ACL) and Custom Namespace
With the Access Control List (ACL), you can ensure that the device only accepts connection requests from AnyDesk clients that are whitelisted. The Access Control List should be applied to any AnyDesk client that will receive connections.
To connect to remote devices using AnyDesk, you need to know the ID or Alias (AnyDesk Address) of the remote device. The AnyDesk Alias consists of your device’s username and a Namespace, for example, John@ad.
The default Namespace is @ad, which refers to AnyDesk and is assigned to all users who have installed the AnyDesk application. Portable AnyDesk (non-installed) has only an ID.
The customized Namespace option allows you to specify a unique name available only to you, for example, YourName@CompanyName. Having a customized Namespace allows you to whitelist the entire Namespace with a wildcard (*@namespace).
Your personal AnyDesk domain enhances device identification and security. You can include the custom Namespace in the Access Control List configuration, ensuring that only devices registered within your Namespace can connect to you.
To configure the Access Control List:
- In the Custom Client Builder, navigate to the Security section and toggle the Access Control List switch.
- In the text field, provide the list of clients allowed to connect to this custom client. You can include only your custom Namespace (e.g., @companyname), restricting connection requests to users within your organization.
Connection Permissions
You can control what the user connecting to the remote device can access remotely.
To manage session permissions:
- In the Custom Client Builder, navigate to Session Permission Profiles.
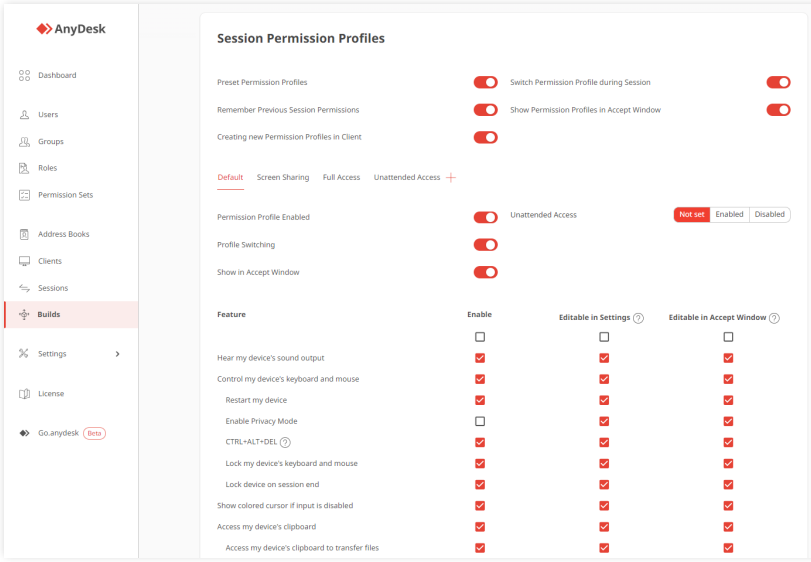
Profiles are configured for the AnyDesk client on the remote device, not for the AnyDesk client being used to connect.
Permission Profiles
It is advisable to delete all existing profiles and configure a custom one if none of the pre-set profiles meet your needs. For further information on Permission Profiles, refer to this page.
Unattended Access
Unattended Access should only be granted for monitored devices or in scenarios involving remote work/home office access via a password.
Passwords for Unattended Access are configured based on permission profiles, allowing multiple permission profiles with different passwords to grant varying access levels according to connecting staff needs. For more details on Unattended Access, refer to this page.
Two-Factor Authentication for Unattended Access
Two-factor authentication can be added to Unattended Access to secure password access. When connecting to the remote device using Unattended Access, you will be prompted to provide an Unattended Access password and an additional security code.
To set up 2FA, you can use any common authentication app like Microsoft Authenticator or Google Authenticator. Configuration must be completed locally in the Settings of the AnyDesk client. For more information on setting up 2FA for Unattended Access, refer to this page.
Enforce User Login
It is recommended to enable the Enforce User Login option for AnyDesk clients that will be used to create connections to remote devices. This feature ensures that each employee needing to establish remote connections must log in to their account within the AnyDesk client. If an unauthorized person gains access to a device with the AnyDesk client, they cannot connect to other devices in this case.
For this functionality to work, all employees who will initiate connections must have an account on my.anydesk II.
Use Case
To illustrate possible configurations using the options mentioned above, refer to the remote support use case below.
Configuring AnyDesk for Remote Support
The requirements for the remote support use case are as follows:
- Incoming-only AnyDesk client for all end-users.
- Outgoing-only AnyDesk client for support staff.
- Accounts on my.anydesk II for all support staff.
- Access control list with a custom Namespace.
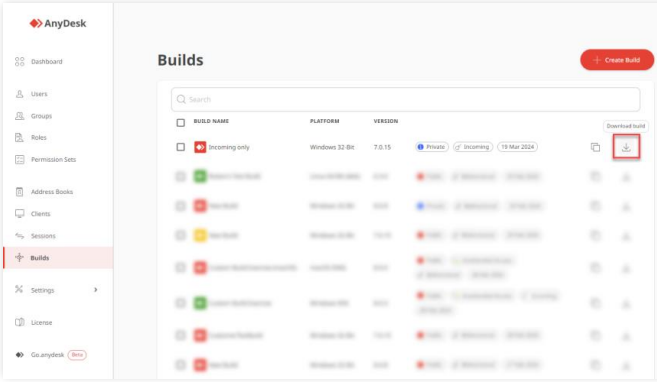
Incoming Only Client
To create an incoming-only AnyDesk client:
- Log in to my.anydesk II and go to the Builds tab.
- Click on Create Build and provide the following information:
a. Select the operating system.
b. In the Build Type field, select Incoming.
c. In the Advanced section, remove preconfigured permission profiles by adding the following key values: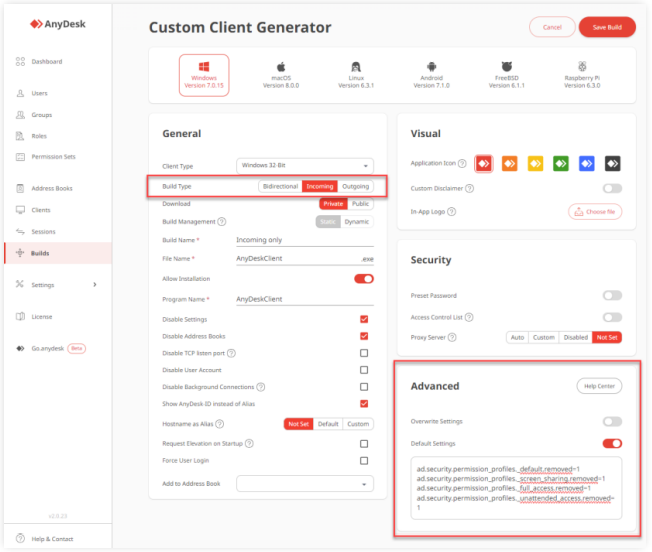
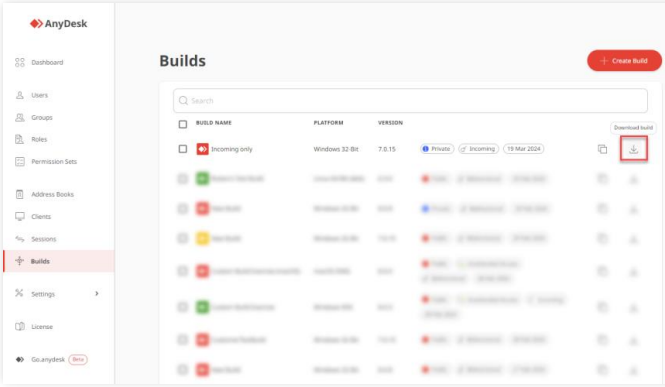
- Click on Save, download the build, and install it on all end-user devices.
Outgoing Only Client
To create an outgoing-only AnyDesk client:
- Log in to my.anydesk II and go to the Builds tab.
- Click on Create Build and provide the following information:
a. Select the operating system.
b. In the Build Type field, select Outgoing.
c. Check the Enforce User Login box.
d. In the Advanced section, add the following key value for automatic registration of the Alias in the custom Namespace. e. In Session Permission Profiles, disable all permissions since no incoming connections can be established.
- Click on Save, download the build, and install it on all devices of the support staff.
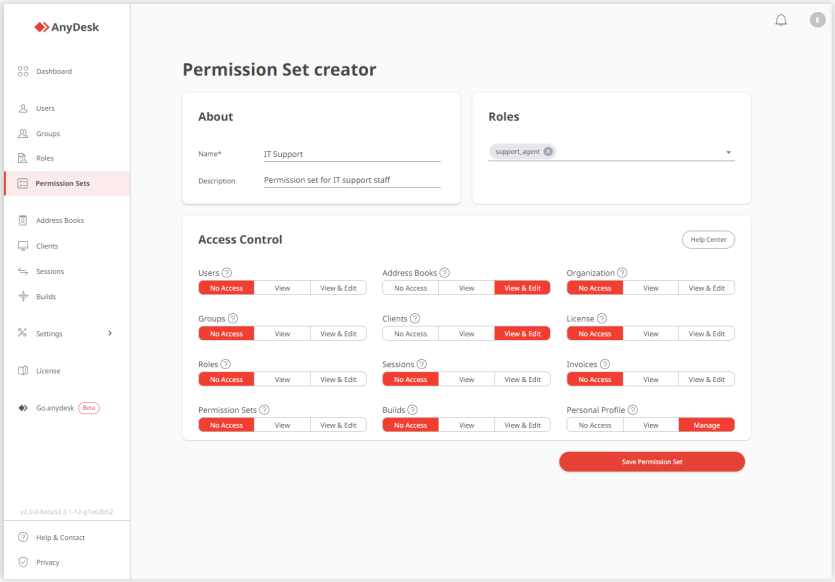
Permissions in my.anydesk II
The permissions granted to users in the my.anydesk II management portal vary based on the employees’ responsibilities. In this case, it is assumed that support staff should have minimal access to the my.anydesk II management portal since their primary use of AnyDesk is to remotely connect to end-users’ devices.
The administrator or license owner can create a specific set of permissions and assign it to support staff. As a result, support staff may have the following permissions in the my.anydesk II management portal:
- View and edit Address Books.
- View and edit the clients list to removing an AnyDesk client from the license in case a device is retired, for instance.
- View and edit personal profile to configure two-factor authentication for their account.
-
View session history, utilizing session notes left by colleagues, for example.
By carefully following this guide, IT administrators and users will enhance their understanding of AnyDesk security configurations and optimize their remote access experience.
Haz clic para continuar leyendo
- Published at