Ultimate Guide to Using AnyDesk Address Book Tags for Enhanced Remote Access
Enhance Your Remote Access with AnyDesk’s Address Book Tags
The AnyDesk Address Book is an essential feature that allows you to effortlessly manage your connection contacts, making it easier to access frequently used remote devices. One of its standout capabilities is the ability to create tags, which helps you categorize and organize your devices according to personalized labels, such as “Technical Support,” “Office,” “Family,” or any category you prefer.
In this guide, we’ll walk you through the process of creating and managing tags in the Address Book via the AnyDesk portal and client.
Creating Tags from the My AnyDesk Portal
1. Access the Address Book
-
Launch AnyDesk:
- Open the AnyDesk application on your computer. If you haven’t installed AnyDesk yet, you can download it from anydesk.com.
-
Navigate to the Address Book:
- Once the application is open, locate the Address Book section on the left panel of the main AnyDesk window.
- Click on Address Book to access it.
2. Create a New Tag
Tags allow you to organize your contacts within the Address Book efficiently. To create a new tag, follow these steps:
-
Select the Tags option:
- Within the Address Book, find the device you want to group under a new tag.
-
Add a New Tag:
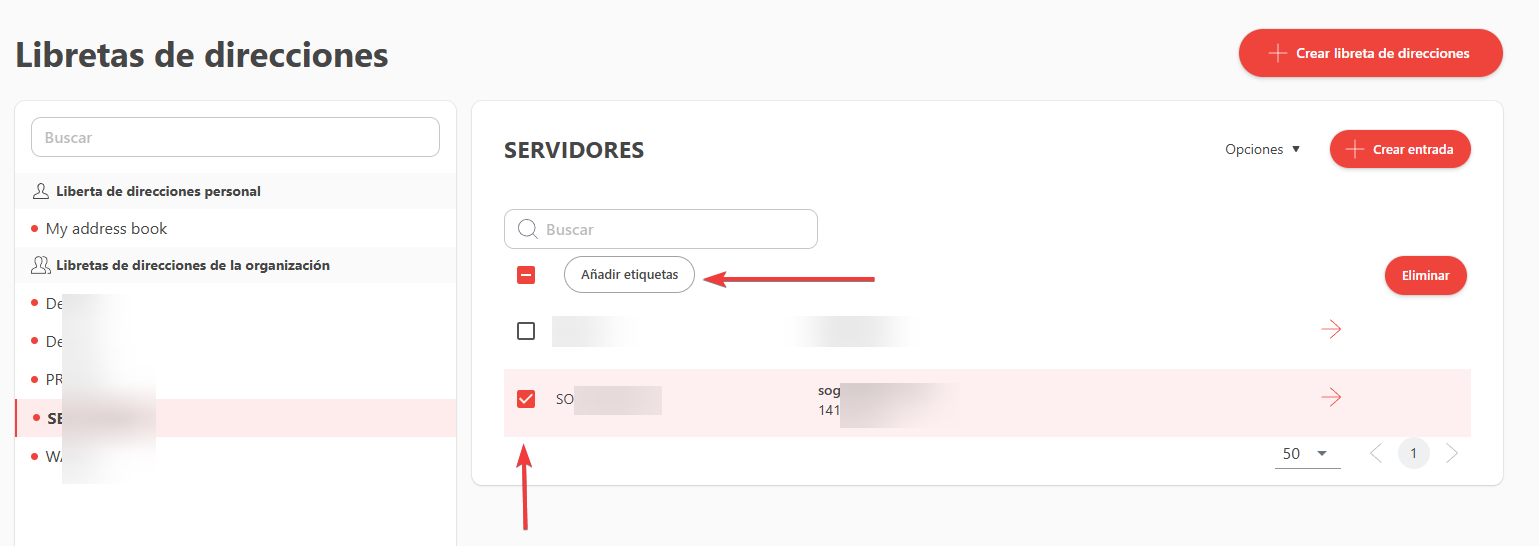
- Select the device for which you wish to create a tag. Once selected, the option to “Add Tags” will appear:
-
-
Name the Tag:
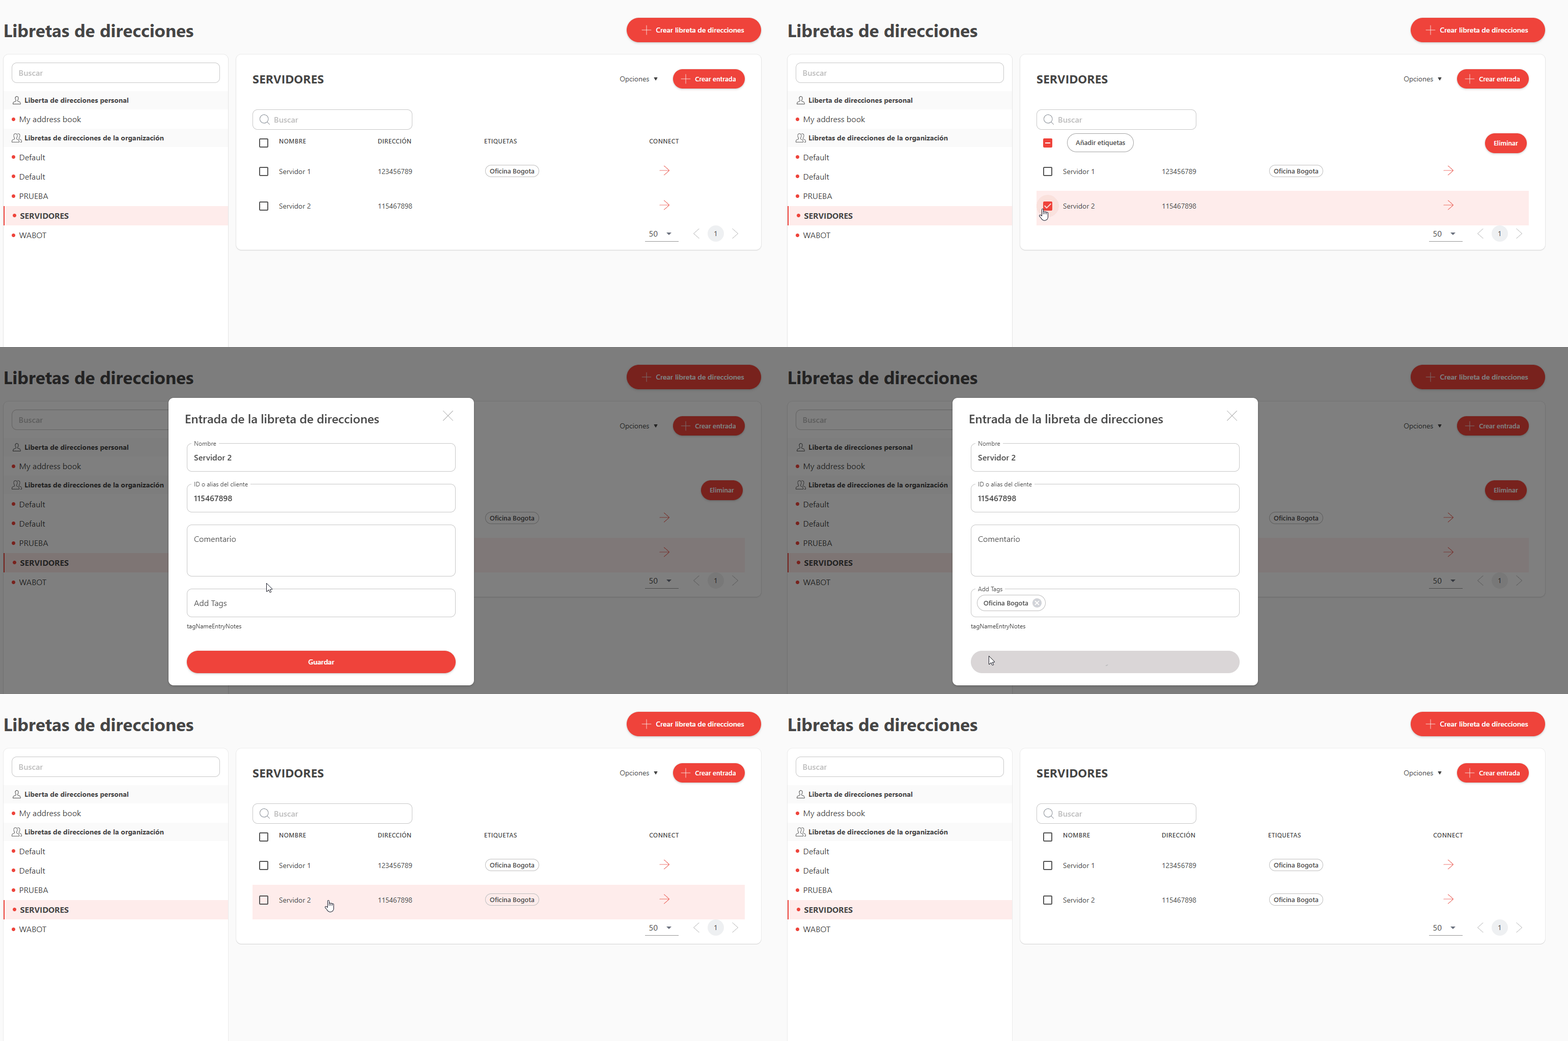
- Enter a descriptive name for your tag, such as “Support,” “Office,” “Family,” or “Clients,” and press Enter, then click on Add Tags:
-

3. Assign Tags to Devices
After creating your tags, you can assign them to contacts, making it easier to organize and find them later.
-
Select a Contact in the Address Book:
- In the Address Book, locate the contact to whom you want to assign a tag.
-
Open Contact Options:
- Right-click on the contact or select the Options icon (usually depicted as three dots or a gear) next to the contact.
-
Assign the Tag:
- In the dropdown menu, select Tags and choose the tag you want to assign.
- You can assign multiple tags to a single contact to categorize them under different groups if necessary.
- Click Save or Apply to confirm the assignment:
-
4. Delete Tags
You may need to rename or delete a tag in the future. Here’s how to do it:
-
Select the Address Book:
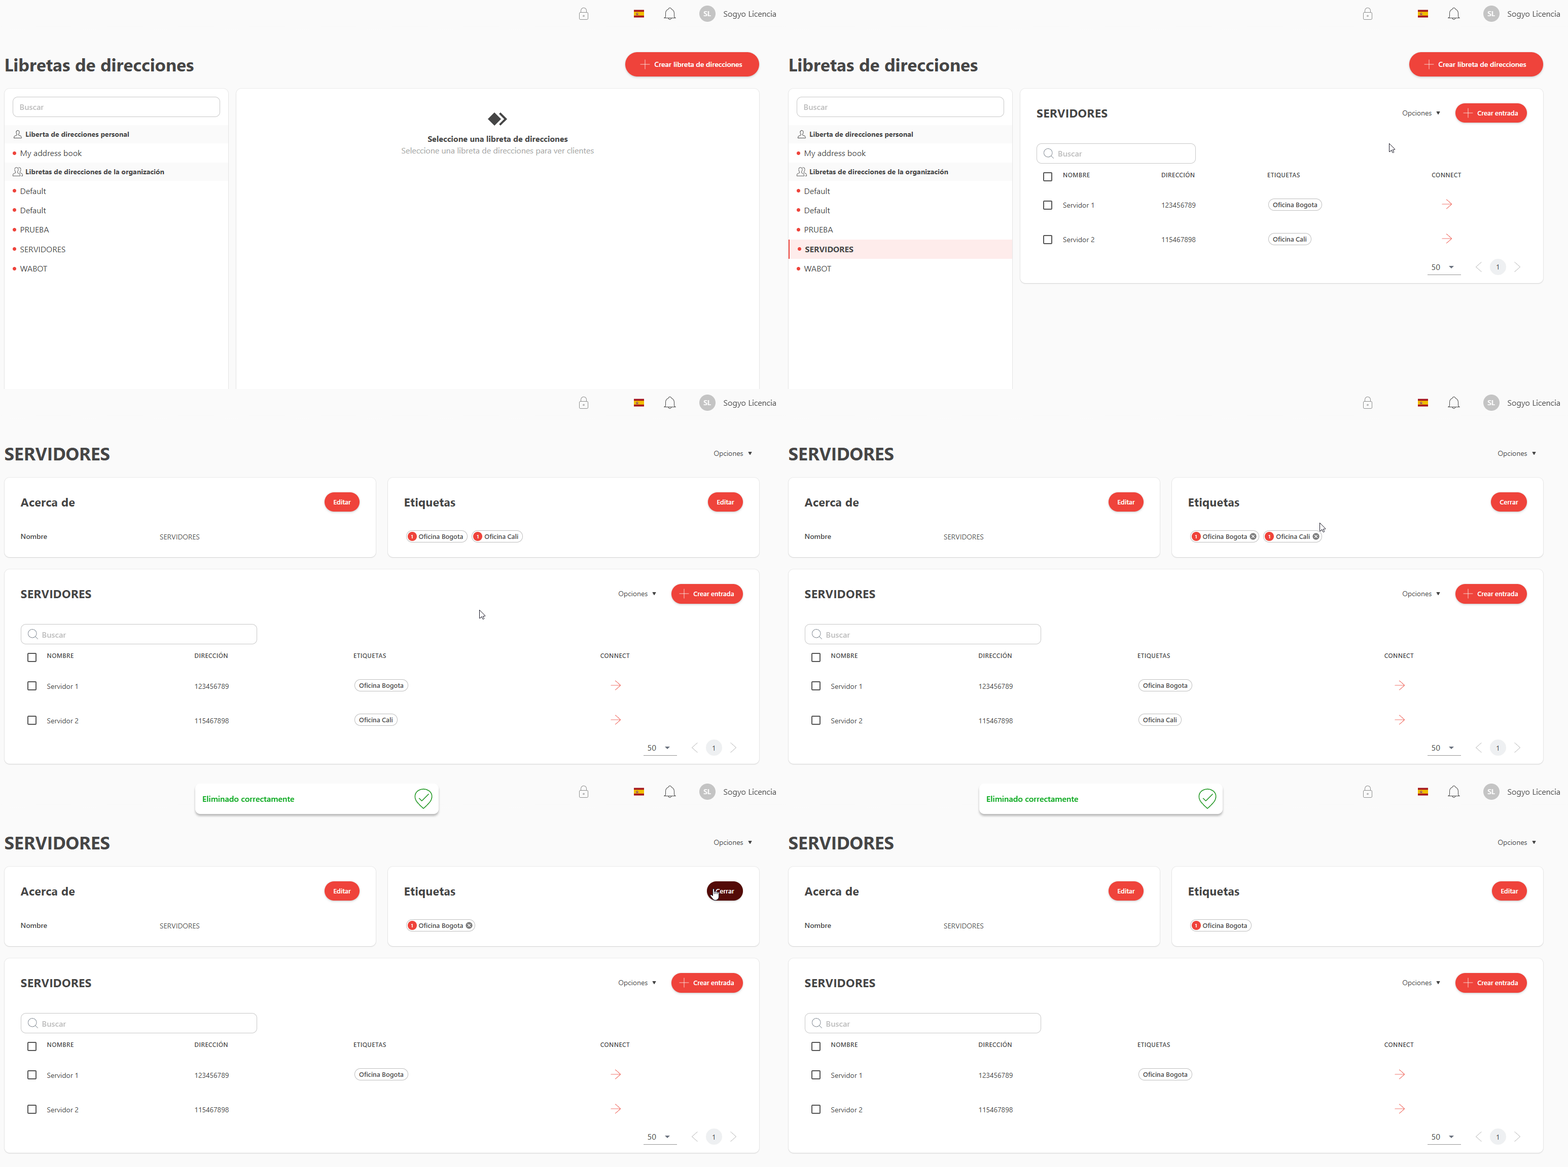
- In the Address Book section, select the address book where you want to modify the tags.
- Choose Options and click on Modify Address Book to apply the changes.
-
Delete a Tag:
- To delete a tag, right-click on the tag you wish to remove.
- Select Delete Tag and confirm the action.
- Note: Deleting a tag will not remove the contacts, only the organizational category:
-
Creating Tags from the AnyDesk Client
1. Access the Address Book
-
Open the Address Book:
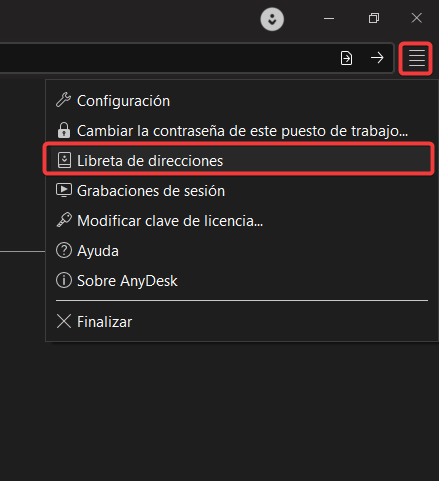
- Once the application is running, locate the Address Book section on the right panel of the main AnyDesk window.
- Click on Address Book to open it:
-
2. Create a New Tag
-
Select the Address Book:
- Within the Address Book, find the device you wish to group under a desired tag.
-
Add a New Tag:
- Right-click on the device you want to create a tag for and select the “Edit Tags” option.
-
Name the Tag:
- Enter a descriptive name for your tag, such as “Support,” “Office,” “Family,” or “Clients,” and press Enter:
-

3. Assign Tags to Devices
Once your tags are created, you can assign them to devices for better organization and quick access.
-
Select the Device in the Address Book:
- Search for the contact to whom you’d like to assign a tag in the Address Book.
-
Open Device Options:
- Select the device you want to edit, right-click, and choose “Edit Tags”.
-
Assign the Tag:
- In the dropdown menu, select Edit Tags.
- You can assign multiple tags to the same contact for cross-categorization if necessary.
- To assign the tag to the device, double-click or drag and drop:
-

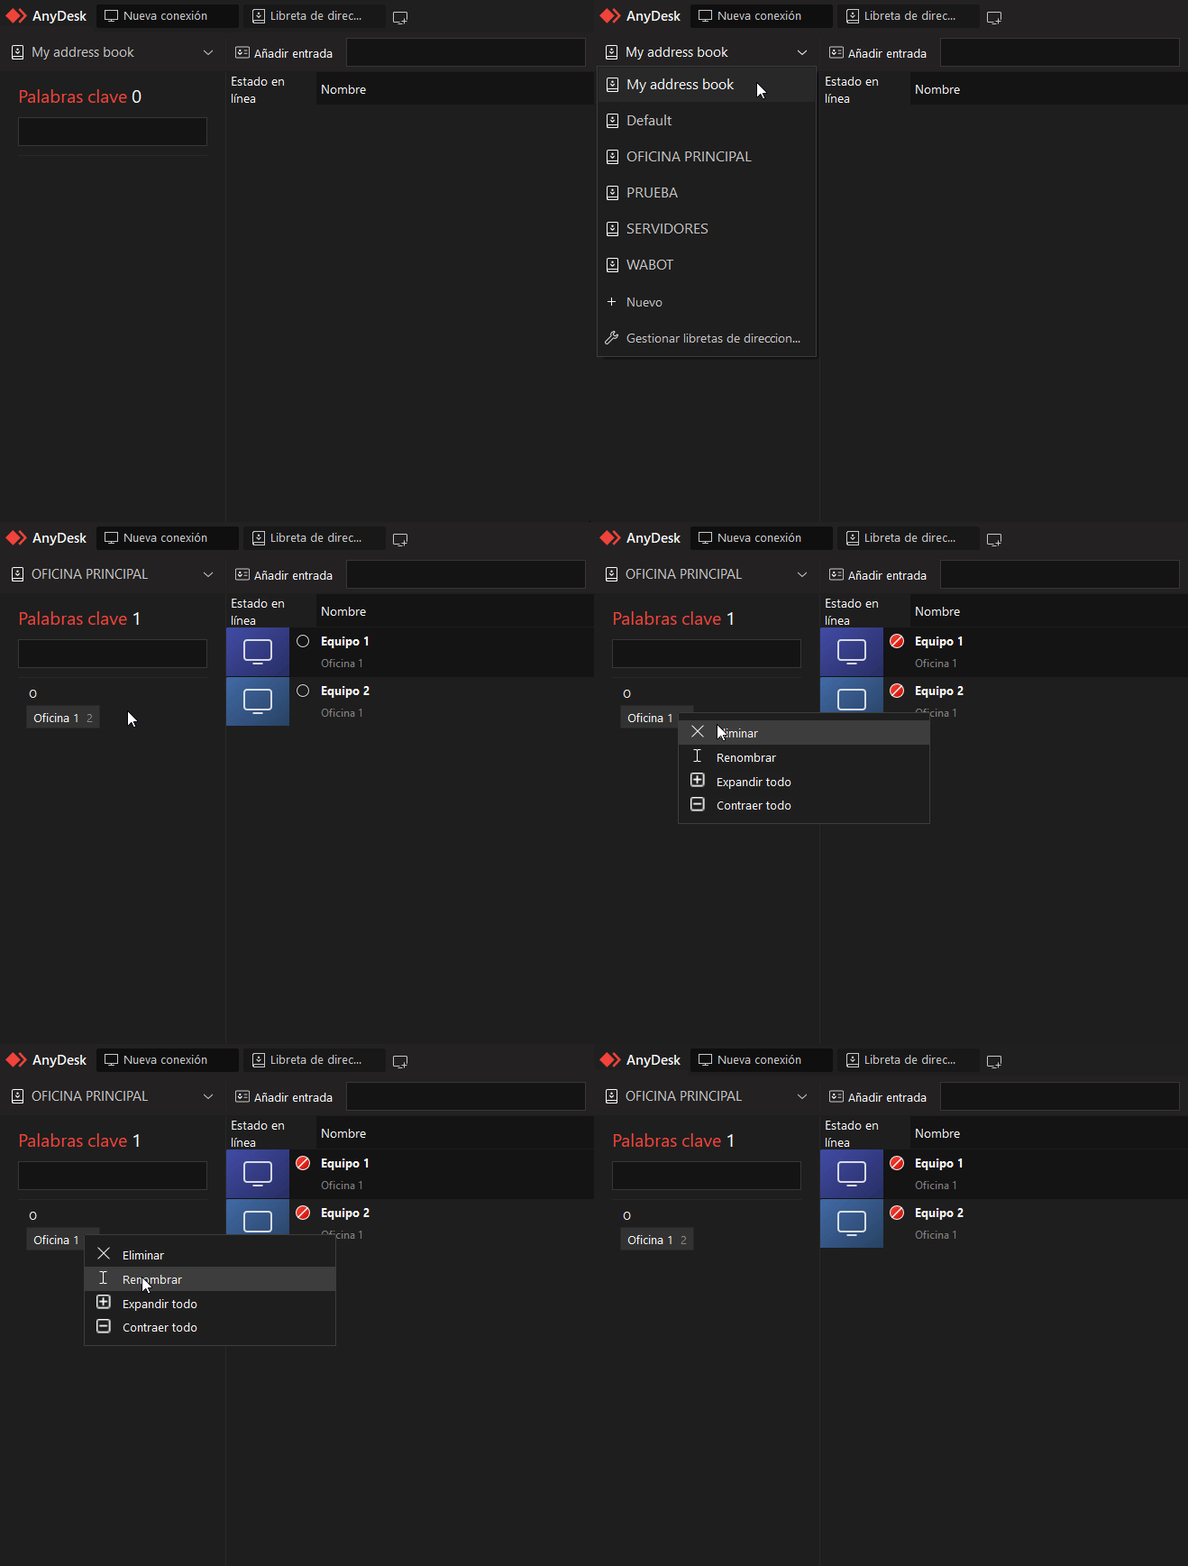
4. Delete and Edit Tags
You may want to rename or delete a tag in the future. Here’s how to do it:
-
Select the Device in the Address Book:
- Find the Address Book containing the tags you want to delete or edit.
-
Delete a Tag:
- Right-click on the tag you want to delete or edit.
- Choose Delete or Rename, and confirm your action.
- Note: Deleting a tag does not remove the devices, only the tag from the Address Book:
-
Benefits of Using Tags in AnyDesk
Utilizing tags in AnyDesk can help you to:
- Organize your contacts effectively.
- Speed up access to specific devices, whether for clients, coworkers, or personal devices.
- Facilitate remote support by categorizing devices by location, department, or purpose.
- Enhance security by organizing critical access points or important devices under distinct tags.
By implementing tags, you can streamline your workflow and improve your remote access experience with AnyDesk!
- Published at