Understanding AnyDesk User Interface: Main Components and Features Explained
User Interface
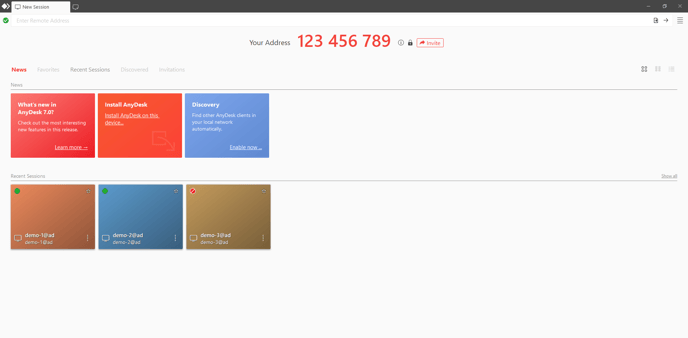
The main window of AnyDesk has 6 main components:
- Your Address: This field contains the AnyDesk-ID or Alias of the AnyDesk client. Next to this field, you can find shortcuts to set up or manage your Unattended Access passwords as well as methods to send invitations to users you would like to connect to you.
- News: This field contains useful information regarding AnyDesk, from what is new in this version of AnyDesk to whether there is a new version of AnyDesk available (depending on the update settings).
- Favorites: This list contains all favorited AnyDesk clients (marked with a gold star). It is recommended to favorite AnyDesk clients you regularly connect to, to locate them easily.
- Recent Sessions: This list contains all AnyDesk clients this client has successfully connected to. Favorited AnyDesk clients will also be at the top of the list.
- Discovered: This list contains all AnyDesk clients on the same local area network as the AnyDesk client. See Settings.
-
Toolbar: This component consists of:
-
Remote Access: Fill out this field with the AnyDesk-ID or Alias of the AnyDesk client you wish to connect to.
Typing into this field will also search through the AnyDesk entries in Discovery, Favorites, Recent Sessions, and Address Book. If available, use the arrow key or the mouse cursor to select the AnyDesk client you wish to connect to from the list. -
Menu: Here you can access:
- your AnyDesk settings,
- set an unattended access password,
- access your Address Book,
- view session recordings,
- change your license,
- access the Help Center, as well as
- view information regarding your AnyDesk client such as version and license.
-
Remote Access: Fill out this field with the AnyDesk-ID or Alias of the AnyDesk client you wish to connect to.
For 3. Favorites, 4. Recent Sessions and 5. Discovered, right-clicking a client entry in the list will produce a context menu with the following options:
- Connect to the client
- Start a File Manager session with the client
- Add/Remove from Favorites
- Set up TCP-tunneling
- Add to Address Book
- Create a Desktop shortcut
- Apply an individual name to the client entry. Please note that this name is only visible locally on the device and does not affect the AnyDesk-ID or Alias.
- Remove the client entry from the list
The client entries in the lists above can also be dragged to the Favorites list or Address Book.
The aforementioned lists also have multiple view types:
- Tiles
- Small tiles
- List
- Published at
